I have been quite busy making things over the summer. My Dad wanted two more frog signs for the fences either side of his gate. He cut the shapes out and I have painted one, and am nearly finished the second one. I embroidered a frog for Joan for her birthday. I have been doing a little embroidery, after lacking inspiration earlier in the year and finding an online class about visible mending of clothes and otherwise embellishing them. That inspired me to do a few things, only one of which involved clothes! I have also made a doll from an old shoe sole from the foreshore. This is a project I have been meaning to do for ages so I am glad to have finished her. I don't have a good finished photo yet though. Another long in the planning stage project which I have now done, is to make a paintbrush from cat whiskers. This took a long time to get ready, as many whiskers had to be collected. In addition to my cats, many client cats also contributed! The tricky part with collection is remembering that you have one in your bag wrapped in a piece of tissue or other container. This week I have been experimenting with plaster bandage, but have not decided exactly what I am doing yet!

Joan's frog, hanging on the frog princess dress, at least I think that would be who should wear it. It was scrunched up with a pile of clothes on a Deptford market stall, and I thought I might use the fabric as it is too small for me. When I looked at it properly though I didn't want to cut it up as I think it is beautiful. I have enjoyed looking at it hanging on the back of the bathroom door ever since! It makes a good background for the frog too. The wall on the right is halfway through being stripped and I suppose could be called 'distressed'. I quite like it!

I appliqued the frog but chose completely the wrong sort of fabric-really easily frayed cotton, so had to stitch it all the way round. I bought the fabric for the colours, not really planning what I would make. I was thinking of Ce n'est pas une pipe with the this is not a frog wording.

It took ages doing this toadstool, then I found that I didn't like it that much.I think the dome part is too big. Adding little people made it a bit better but still not as keen as I thought I would be.

This book is very inspiring, and as soon as I saw the idea for a cat whisker brush I was excited to try it. I have had some sticks lying around for a few years, picked up because of the pretty yellow lichen on them. Well, the lichen is no more, as the sticks turned out to be the perfect handles for the two brushes I made. I peeled off the bark, cleaned them up using sand paper and a slight amount of whittling, then carved the end to the right size to fit into the ferrule, made from a piece of a goose quill. (I had some of those in the drawer, also around for years!) The hardest thing to do was to cut the end of the quill to the right size. It has to be scored round and round, rather than cut straight through as it needs to stay in shape. It is a very hard, plastic like material. Actually, that was not the hardest part, it was laying the whiskers, which are nearly all slightly curved, in such a way that they lay in the same direction and form a point. I had got better at it by the second brush but it is fiddly. I used silicon glue inside the ferrule as I thought that would be a good waterproof option. I later wrapped the ferrule in plaster bandage to secure everything a bit more. You have to cut the bristles straight across at the ferule end once they are tied, with a knife/scalpel-most satisfying. I also changed what I did from his advice by making a large open knot before laying down the bristles, as I thought that would mean less movement when tying them! Another thing I did, to make it possible to poke the brush through the ferrule from the top, (once the dab of glue I used to secure the cut bristles was dry), was to use soap on the brush to form a point and let it dry. Otherwise it would be impossible to get through the hole. I was pleased with the result of this project. The brushes are very long and thin, as you would expect, and make a beautiful long thin line when pulled backwards along the paper.

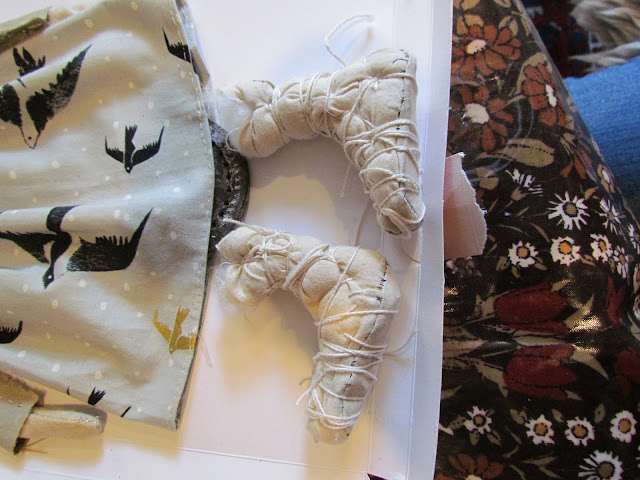
What to do with the doll's feet took me a while to work out. I wanted her to stand up, and originally planned to use clay with a slot in, and make two feet together. Then I thought I could use a wire armature, and poke the wire through the holes in the sole, and make her stand up. I realised after a bit of experimentation that it would not work. In the end, I kept the wire, with sewn and stuffed feet around it, and card soles in the bottom, and decided to use plaster bandage around them. The string is to shape the feet before the bandage layer.
Here are the finished feet. Then I had the problem of how to attach them. I solved it eventually and will show that another time.

I used sliced cork for the sole, and was going to paint it but have left it as I like how it looks.
Her face is drawn with Faber Castell Polychromos pencils.
Frog one!
A crystal ball wrapped in cling film.
Then half covered in bandage.
And finally, a project involving the girlettes has been completed. They will show and tell soon!


